
By Chris Keller|Aug 01, 2023
When we share data with others, we do so intentionally—a law firm sending a client legal documents, for instance. But those documents shouldn’t include ancillary information that might reveal other, more sensitive details. Because all digital files contain metadata—additional information about the file or its contents—it’s worth knowing what you could share inadvertently and learning how to avoid doing so.
Much metadata is innocuous, like file type and file size. However, some common file types contain additional metadata that can reveal information that you might not want to share. In this situation, the most common file types are Microsoft Office documents and PDF files. Let’s look at each and how you can see what metadata is there and remove it before sharing.
Cleaning Metadata from Microsoft Office Documents
Metadata that you might want to remove from Microsoft Office documents falls into two broad categories: reviewer information, like comments and tracked changes, and document properties.
The first thing to do when removing metadata is to use File > Save As to make a copy of your file and work on the copy. This automatically removes or resets some metadata and allows you to delete other metadata without worrying about losing it from your original.
If you use change tracking in Word or comments in any Office app, you may want to remove those before sharing a document to prevent recipients from seeing internal conversations or information about who worked on the document.
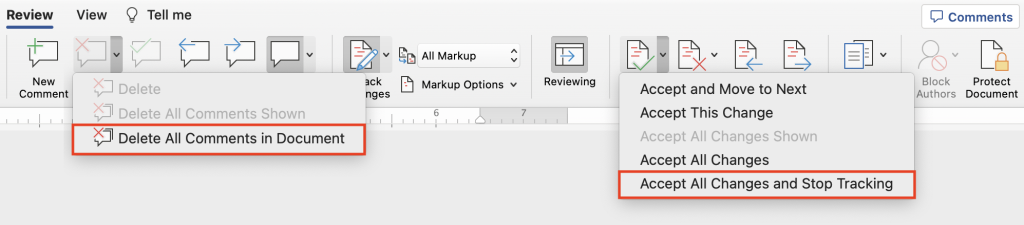
To remove change tracking and comments in Word, click Review in the toolbar. Next, click the arrow next to the Delete button in the comments section and choose Delete All Comments in Document. Finally, click the arrow next to Accept in the change tracking section and choose Accept All Changes and Stop Tracking. Browse through the document to make sure accepting all changes didn’t do something unexpected, and then save.
Excel and PowerPoint lack change tracking but let you add comments. Like Word, PowerPoint’s Review toolbar offers a similar menu associated with the Delete button; choose Delete All Comments in Presentation to clear the comments. In Excel, switch to the Review toolbar, choose Edit > Select All (comments can be deleted only from selected cells), and click the Delete button in the toolbar.
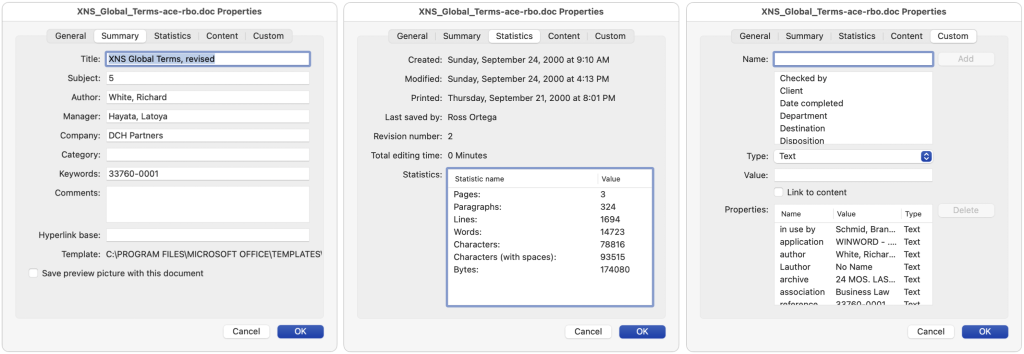
To see what metadata is in the document properties of a Word, Excel, or PowerPoint document, choose File > Properties, and look in the Summary, Statistics, and Custom tabs. Generally speaking, these won’t contain anything damning, but they may reveal information like the names of people associated with the document. Don’t assume there’s no metadata here just because you didn’t add anything manually—document control systems can add metadata you don’t expect.
The three Office apps offer different approaches to removing personal information in the Summary and Custom tabs, and the process is extremely different than in the Windows versions. (For Windows, refer to Microsoft’s instructions.) Here’s how you remove personal information:
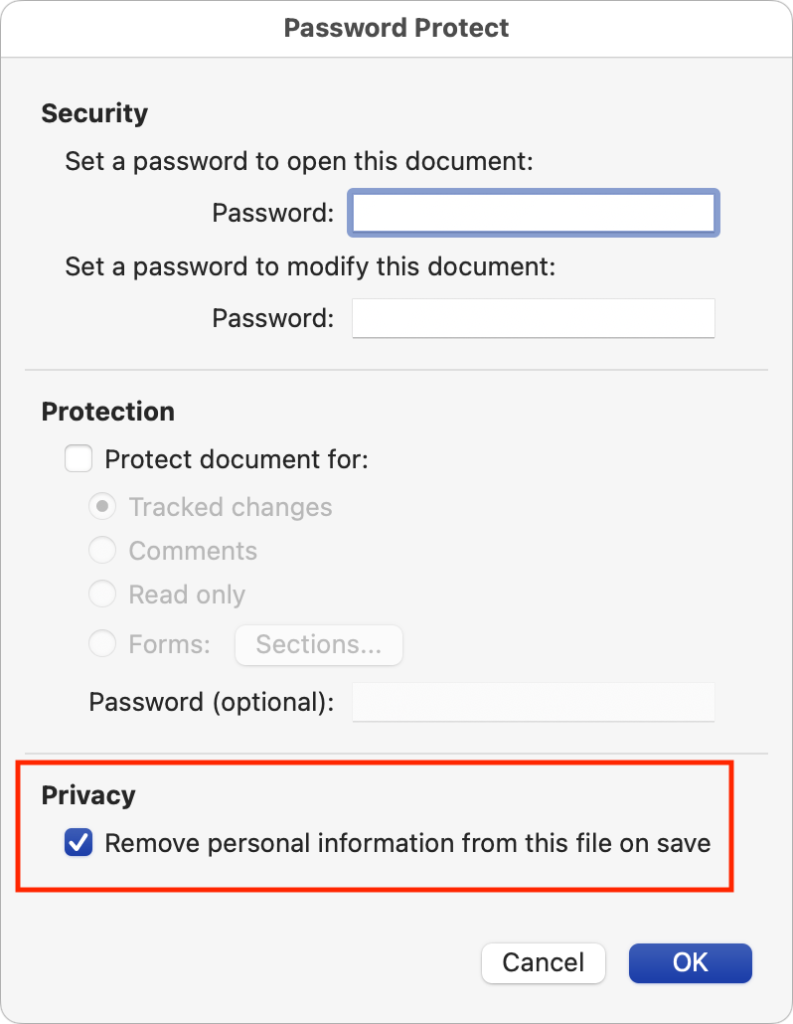
- Word: Choose Tools > Protect Document, and in the Password Protect dialog, select “Remove personal information from this file on save.” Save the document, and then go back to File > Properties to make sure it removed everything that concerns you.
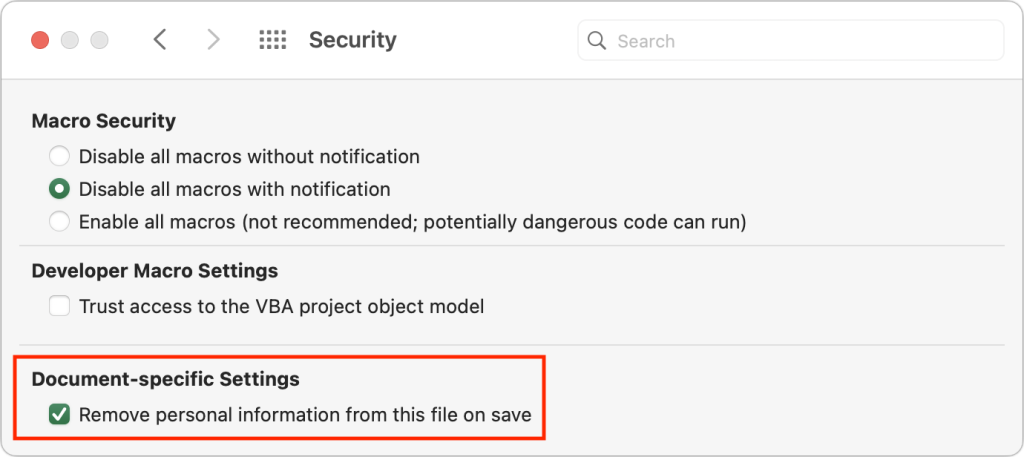
- Excel: Choose Excel > Preferences > Security, and select the “Remove personal information from this file on save” checkbox. Then save the document and verify that the desired metadata is gone.
- PowerPoint: PowerPoint appears to lack that checkbox, but you can choose File > Properties and manually delete all the information from the Summary and Custom tabs before saving the document.
Information in the Statistics tab is generally cleared or reset by using File > Save As, so you don’t need to do anything more to clear it.
If you’re truly concerned about not revealing additional information in shared Office documents, think about what might appear in headers and footers, footnotes, text that’s white (and thus invisible), hyperlinks, and macros. Finally, remember that you can hide text in Word, columns and rows in Excel, and slides in PowerPoint—that hidden content may reveal sensitive information if it’s allowed to remain in a shared document. In PowerPoint, you may also want to check for presenter notes you don’t want to share; choose View > Notes.
Cleaning Metadata from PDFs
Another way to remove a great deal of metadata from Office documents is to share a PDF of the document instead. By “printing” to PDF, anything that’s invisible automatically disappears. However, PDFs have their own metadata that you might want to review and remove. How you go about it depends on which apps you have available: Adobe Acrobat Pro or just Apple’s bundled Preview.
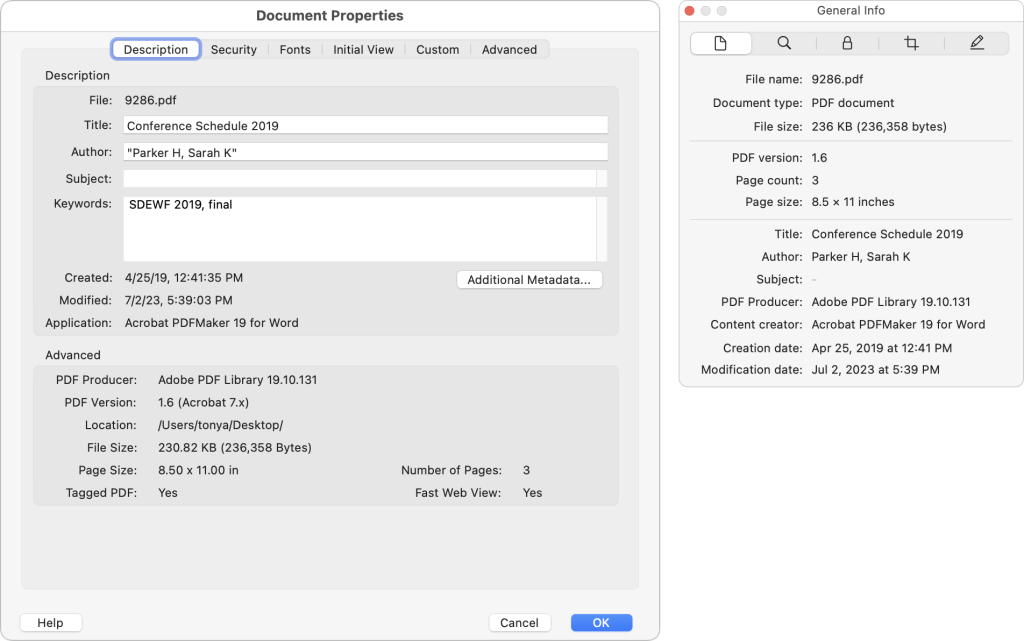
First, to view metadata in Acrobat Pro, choose File > Properties and click the Description tab (left). In Preview, choose Tools > Show Inspector and click the leftmost General Info tab (right).
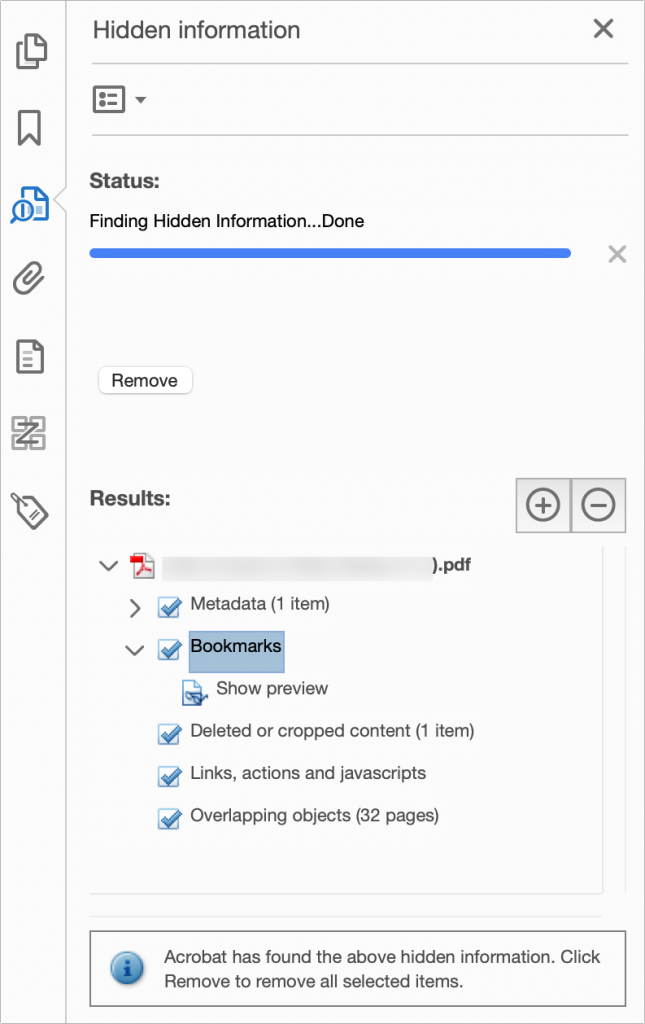
Adobe Acrobat Pro provides several tools for redacting content (replacing it with a black box) and removing hidden content and metadata. To access them, click the Tools tab at the top of the screen and click Redact to display a pair of buttons on the secondary toolbar. Redact Text & Images lets you redact content, but you’ll most likely want to use Sanitize Document, which removes metadata and a boatload of possible hidden data.
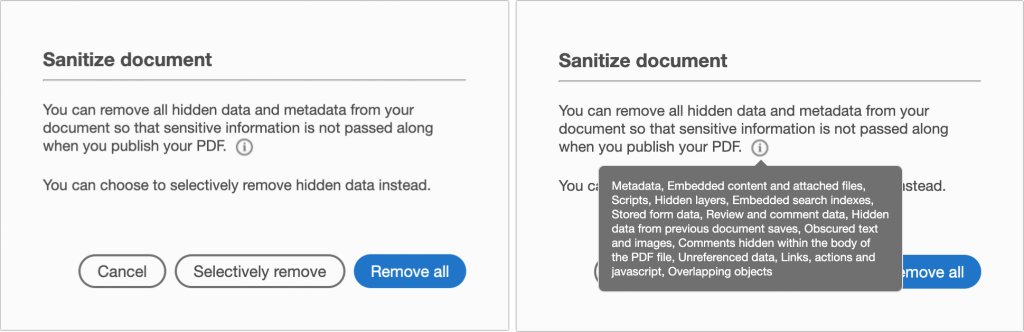
It’s easiest to click Remove All, but you might prefer to click Selectively Remove and look at what Acrobat Pro finds before clicking the Remove button in the Hidden Information tab.
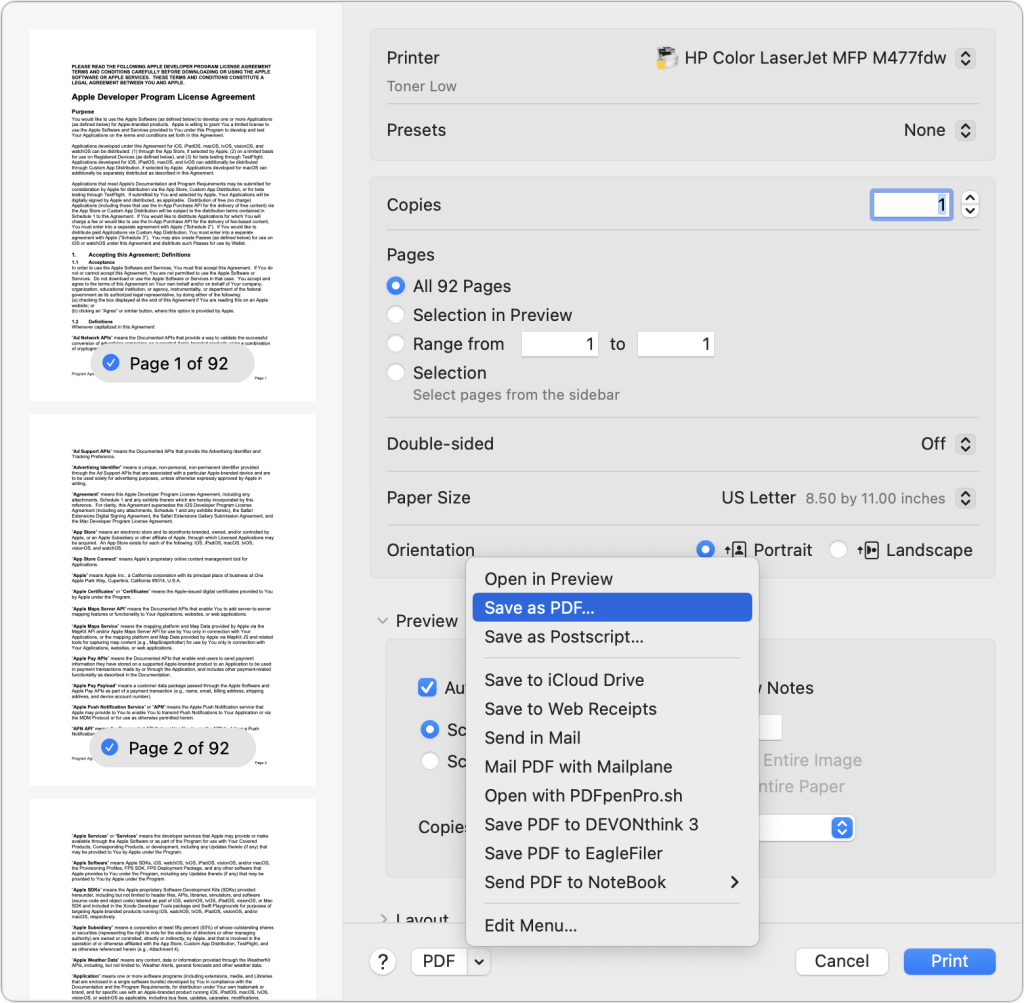
For those who rely on Preview for working with PDFs, there’s a simple process for removing metadata and anything else lurking in a PDF that’s good enough for most situations.
Choose File > Print, and then choose Save As PDF from the pop-up PDF menu at the bottom of the Print dialog. This may seem counterintuitive, but as with any other document type, printing in this way creates a PDF that contains only the visible information in the original, ensuring that all hidden data and metadata are removed.
Although all Mac users have Preview, there is another common option for removing metadata from PDFs—online tools. They’re easily found, but we urge caution. If you’re concerned about the recipient of your PDF being able to see metadata or hidden content, why would you trust a free online service with that information? If you want to head down this path, stick with sites headquartered in the European Union, which has stronger privacy regulations than other parts of the world. For instance, Metadata2Go, which displays all the metadata in a file, is in Germany, and Sejda, whose Edit PDF Metadata tool can remove all metadata, is based in the Netherlands.
One last thought. If you’ve gotten to this point and are thinking that you need an enterprise-wide solution to removing metadata, look for services like Adarsus’s MetaClean, which can automatically remove metadata from files sent as email attachments or stored on file servers.
(Featured image by iStock.com/Imilian)
Social Media: You want to share a file, but you don’t want to share details it may have picked up while under construction—who worked on it and when, tracked changes, hidden text, and more. Find out how to remove private metadata from Office documents and PDFs.